What is ElevenLabs Voiceover Studio?
ElevenLabs Voiceover Studio is a cutting-edge tool designed to revolutionize the way creators produce audio content. It’s an intuitive, web-based platform that combines advanced AI voice technology with a user-friendly interface, allowing users to create high-quality voiceovers, dialogues, and audio narratives with ease.
Unlike traditional audio production tools, Voiceover Studio harnesses the power of AI to generate lifelike voices and seamlessly integrate sound effects, offering a comprehensive solution for a wide range of audio projects. Whether you’re working on podcasts, audiobooks, educational content, or creative storytelling, this tool provides the flexibility and features to bring your ideas to life.
Key Features and Benefits
- AI-Powered Voice Generation: Utilize a diverse range of AI voices or even clone your own voice for personalized projects.
- Intuitive Timeline Interface: Easily manage multiple speakers and sound effects on a visual timeline, similar to professional audio editing software.
- Dynamic Text-to-Speech: Convert your written scripts into natural-sounding speech with adjustable pacing and emphasis.
- Integrated Sound Effects: Add atmosphere and depth to your projects with a library of AI-generated sound effects.
- Multi-Language Support: Create content in various languages or translate existing projects with the click of a button.
- CSV Script Import: Streamline your workflow by importing pre-written scripts in CSV format, making it easy to manage complex projects.
- Flexible Export Options: Export your finished projects in various audio formats suitable for different platforms and uses.
- Collaboration-Friendly: Work on projects with team members or clients, sharing and iterating on content easily.
By combining these features, ElevenLabs Voiceover Studio empowers creators to produce professional-quality audio content without the need for extensive technical knowledge or expensive equipment. It’s a game-changer for content creators, marketers, educators, and anyone looking to add a polished audio dimension to their projects.
In the following sections, we’ll dive deep into how to use Voiceover Studio effectively, exploring its features and providing tips to help you make the most of this powerful tool.
Getting Started with Voiceover Studio
Embarking on your first project with ElevenLabs Voiceover Studio is an exciting step towards creating professional-quality audio content. The process is designed to be intuitive and user-friendly, allowing you to quickly set up your workspace and dive into the creative process. Whether you’re starting from scratch or working with existing video content, Voiceover Studio provides a flexible starting point for your audio projects. Let’s walk through the steps to create your new project and set the stage for your audio creation journey.
Creating a New Project
- Access Voiceover Studio: Log in to your ElevenLabs account and navigate to the Voiceover Studio section.
- Initiate a New Project: Click on the "Create New Project" or "+" button, typically found on the dashboard.
- Choose Your Starting Point: You can either start from scratch or upload a video if you want to create a voiceover for existing video content.
- Name Your Project: Give your project a descriptive name. You can always change this later.
- Create Studio: Click the "Create Studio" button to enter the Voiceover Studio interface.
Overview of the User Interface
Once your project is created, you’ll be presented with the Voiceover Studio interface. Here’s a breakdown of the key elements:
- Top Bar:
- Project name (editable)
- Save button
- Undo/Redo options
- Export button
- Speaker Cards Section (Upper Half):
- This is where you’ll see and manage your speaker cards.
- Each card represents a different voice or sound effect in your project.
- Timeline (Lower Half):
- This is the heart of your project, where you’ll arrange your audio elements.
- Divided into tracks, each representing a speaker or sound effect.
- Track Information (Left Side of Timeline):
- Shows whether a track is for Voiceover or SFX.
- Contains options for soloing or muting tracks.
- Clip Area (Middle of Timeline):
- Where you create and arrange audio clips for each track.
- Where you create and arrange audio clips for each track.
- Clip Settings (Right Side of Timeline):
- When a clip is selected, you can adjust its settings here.
- When a clip is selected, you can adjust its settings here.
- Playback Controls:
- Usually located at the bottom, including play, pause, and scrubbing options.
- Usually located at the bottom, including play, pause, and scrubbing options.
- Add Track Button:
- Typically found at the bottom left, allows you to add new Voiceover or SFX tracks.
- Typically found at the bottom left, allows you to add new Voiceover or SFX tracks.
- Generate Button:
- Usually located at the bottom right, used to generate audio for your clips.
- Usually located at the bottom right, used to generate audio for your clips.
- Language Selection:
- Often found at the bottom, allows you to add or switch between languages for dubbing.
- Often found at the bottom, allows you to add or switch between languages for dubbing.
Familiarizing yourself with this layout will help you navigate the Voiceover Studio efficiently. In the following sections, we’ll dive deeper into how to use each of these elements to create your voiceover project.
Understanding the Timeline
The timeline is the heart of your project in ElevenLabs Voiceover Studio. It’s where you’ll arrange, edit, and fine-tune your audio elements to create your final product. Understanding how to effectively use the timeline is crucial for creating professional-quality voiceovers and audio narratives.
The timeline in Voiceover Studio is a visual representation of your project’s audio elements over time. Here’s what you need to know:
- Tracks:
- The timeline is divided horizontally into tracks.
- Each track represents a different speaker or sound effect.
- Tracks are stacked vertically, allowing you to see how different audio elements align.
- Clips:
- Audio elements are represented as clips on the tracks.
- Voiceover clips typically show the spoken text.
- SFX clips show the effect name or description.
- Time Ruler:
- Located at the top of the timeline, it shows the duration of your project.
- Helps you align clips precisely.
- Playhead:
- A vertical line that shows the current playback position.
- You can drag it to scrub through your project.
Remember, after making changes to your timeline, you may need to regenerate the audio by clicking the “Generate” button, usually located at the bottom right of the interface.
By mastering these timeline features, you’ll be able to create complex, multi-layered audio projects with precision and ease in ElevenLabs Voiceover Studio.
Adding and Editing Tracks
Adding a New Track:
- Click the “Add Track” button, usually located at the bottom left of the timeline.
- Choose between a Voiceover track or an SFX track.
Renaming Tracks:
- Click on the track name (e.g., “New Voiceover Speaker”) to rename it.
- Use descriptive names to keep your project organized.
Reordering Tracks:
- Click and drag a track up or down to change its position in the stack.
Track Controls:
- Solo: Click the headphone icon to hear only that track during playback.
- Mute: Use the speaker icon to temporarily silence a track.
- Delete: Click the three dots next to the track name and select “Delete” to remove the track.
ElevenLabs Voiceover Studio Shortcuts

Working with Clips
- Adding a Clip:
- For Voiceover tracks: Click on the timeline where you want the clip to start.
- For SFX tracks: Click on the timeline and choose or describe your desired sound effect.
- Editing Clip Content:
- For Voiceover clips: Edit the text in the speaker card above the timeline.
- For SFX clips: Modify the description or choose a different effect.
- Moving Clips:
- Click and drag a clip to a new position on the same track or a different track.
- Click and drag a clip to a new position on the same track or a different track.
- Resizing Clips:
- For SFX clips: Click and drag the edges of the clip to adjust its duration.
- For Voiceover clips: The length is typically determined by the text content, but you can adjust timing in the clip settings.
- Deleting Clips:
- Right-click on a clip and select “Delete”, or use the delete/backspace key.
- Right-click on a clip and select “Delete”, or use the delete/backspace key.
- Clip Settings:
- Select a clip to view its settings on the right side of the timeline.
- Adjust parameters like voice style, speed, and emphasis as needed.
Speaker Cards and Voice Generation
Creating Speaker Cards
Speaker cards are a key feature of the Voiceover Studio, representing each voice in your project. To create a new speaker card, you first need to add a Voiceover track to your timeline. Once you’ve done this, a new speaker card will automatically appear in the upper section of the interface.
Each speaker card is linked to its corresponding track on the timeline. This connection allows you to easily manage and edit the content for each speaker. To add content to a speaker card, simply click on it and start typing your script. As you type, you’ll see the corresponding clip on the timeline adjust to reflect the length of your text.
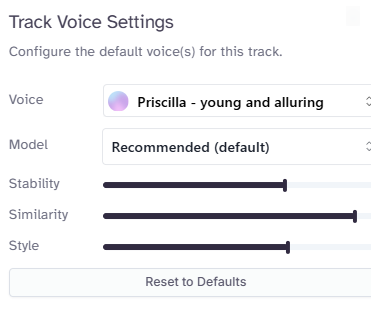
Customizing Voices and Settings
One of the most powerful features of ElevenLabs Voiceover Studio is the ability to customize voices for each speaker. After creating a speaker card, you can click on the settings icon (usually a gear or cog symbol) to access voice customization options.
In the voice settings, you’ll find a variety of voices to choose from, each with its own unique characteristics. You can preview these voices to find the one that best fits your project’s needs. If you’ve created a Professional Voice Clone, you can even use your own voice for the speaker.
Beyond selecting a voice, you can fine-tune various aspects of the voice performance. These may include:
- Stability: Adjust how consistent the voice sounds across different generations.
- Clarity + Similarity Enhancement: Fine-tune the clarity of the voice and how closely it matches the original sample.
- Style: Modify the speaking style to fit different contexts or emotions.
You can also adjust the speaking rate and add emphasis to specific words or phrases to create a more natural and engaging voiceover.
Remember, these settings can be adjusted at any time during your project, allowing you to experiment and refine the voice performance until you achieve the perfect sound for your voiceover.
Integrating Sound Effects (SFX)
Elevenlabs Voiceover Studio doesn’t just excel at voice generation; it also provides powerful tools for integrating sound effects into your projects. This feature allows you to create rich, immersive audio experiences that go beyond simple voiceovers.
Adding SFX Tracks
To begin working with sound effects, you’ll need to add an SFX track to your timeline. Look for the “Add Track” button, typically located at the bottom of the timeline interface. When you click this, you’ll be given the option to add an SFX track.
Once you’ve added an SFX track, you’ll notice it looks slightly different from a voiceover track. Instead of being linked to a speaker card, it’s designed specifically for sound effect clips.
Generating and Placing Sound Effects
ElevenLabs Voiceover Studio uses AI to generate sound effects based on your descriptions. To add a sound effect:
- Click on your SFX track at the point where you want the sound effect to begin.
- A dialog box will appear where you can describe the sound effect you want.
- Type in your description, such as “door creaking open” or “distant thunder”.
- Click “Generate” to create your sound effect.
The AI will process your description and generate a sound effect, which will appear as a clip on your SFX track. You can then manipulate this clip much like a voiceover clip:
- Drag it to adjust its position in the timeline
- Stretch or shrink it to change its duration
- Adjust its volume using the clip settings
If the generated sound effect isn’t quite right, you can easily regenerate it with a modified description. This iterative process allows you to fine-tune your sound design until it perfectly matches your vision.
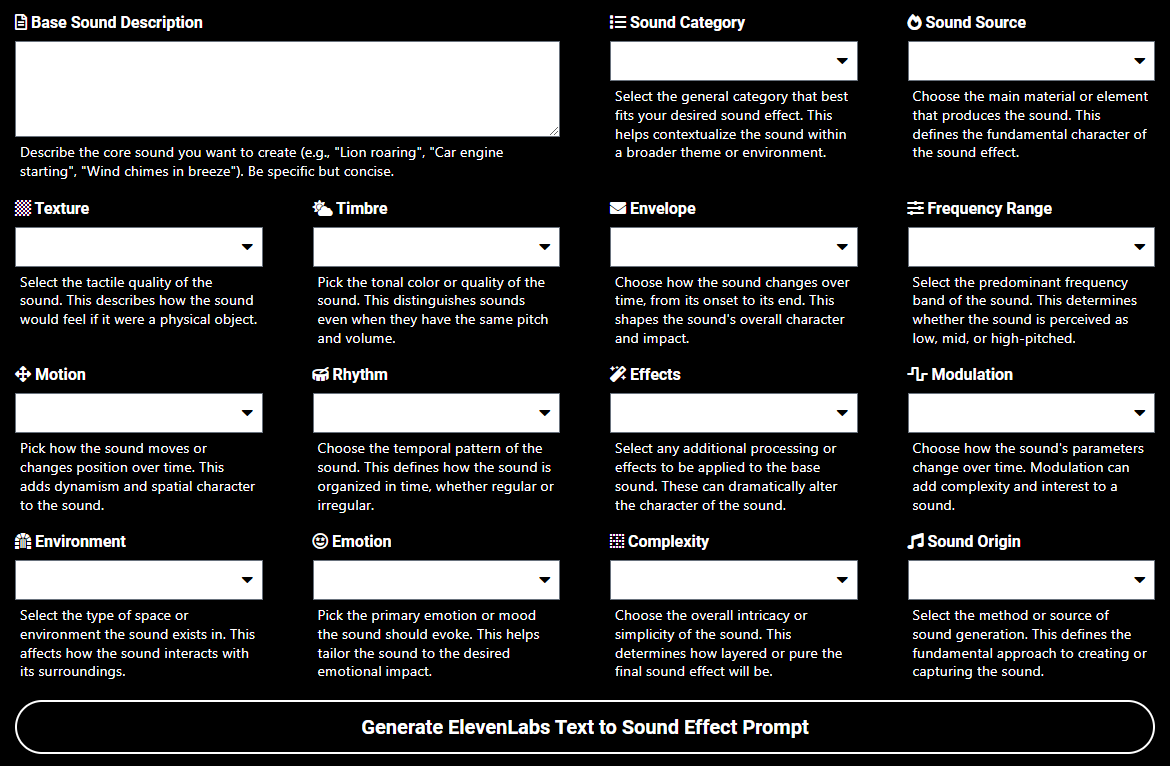
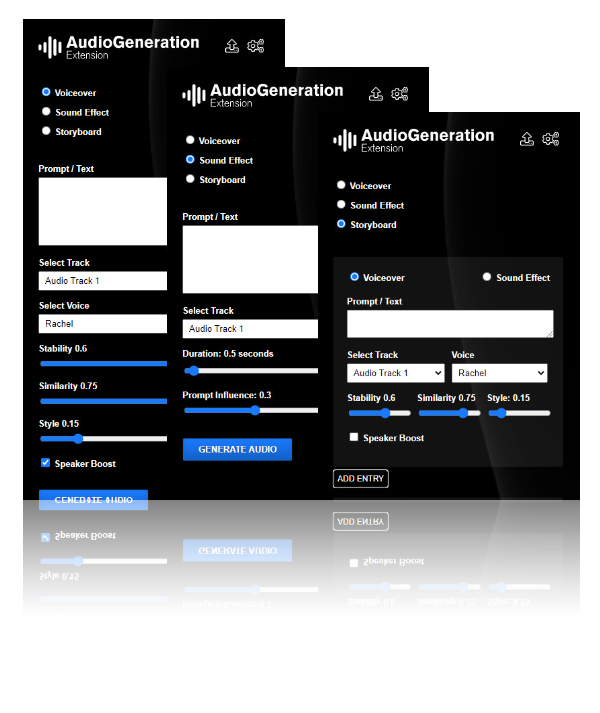
Supercharge Your SFX Prompts!
Want to take your sound effect creation skills to the next level? Check out my ElevenLabs Text to Sound Effect Prompt Generator! This specially designed tool helps you craft precise and effective prompts for your sound effects. It analyzes your descriptions and generates optimized prompts that the Voiceover Studio's AI understands better. This way, you'll consistently get high-quality and fitting sound effects for your projects.
CSV Script Import Function
For larger projects or those with pre-written scripts, ElevenLabs Voiceover Studio offers a CSV (Comma-Separated Values) script import function. This feature can save you significant time and streamline your workflow.
Understanding the CSV Format
The CSV format for Voiceover Studio is straightforward but requires careful preparation. Your CSV file should contain columns for:
- Speaker: The name or identifier for each voice
- Line: The text to be spoken
- Start Time (optional): When the line should begin (in seconds)
- End Time (optional): When the line should end (in seconds)
If you omit the start and end times, the Studio will automatically arrange your clips sequentially.
Creating and Importing CSV Scripts
To create a CSV script:
- Open a spreadsheet program like Microsoft Excel or Google Sheets.
- Create columns for Speaker, Line, Start Time, and End Time (if using).
- Fill in your script, ensuring each line of dialogue is in its own row.
- Save or export your file in CSV format.
To import your CSV script:
- In Voiceover Studio, look for an “Import” or “Upload” button, often near the timeline.
- Select your CSV file when prompted.
- The Studio will process your file and create speaker tracks and clips based on your script.
Example of a CSV Script
Here’s a simple example of how your CSV might look:
					speaker,line,start_time,end_time
Narrator,"Welcome to our audio tour of the museum.",0,5
Henry,"On your left, you'll see the famous painting 'Starry Night'.",6,12
Tourist,"Wow, it's even more beautiful in person!",13,16
Maria,"Indeed it is. Van Gogh painted this while in an asylum in France.",17,23
Remember, you can omit the start_time and end_time columns if you prefer to arrange your clips manually on the timeline.
ElevenLabs Voiceover Studio CSV Generator
This handy CSV script generator tool streamlines the workflow with ElevenLabs Voiceover Studio. The intuitive interface facilitates easy input of script data and generates a properly formatted CSV file ready for import. Users can enter speakers and their lines in the form below, adding or removing entries as needed with the “Add Entry” button and trash bin icon. Once the entire script is entered, clicking “Copy CSV to Clipboard” generates the formatted CSV content. This content can then be pasted into a text file, saved with a .csv extension using UTF-8 encoding, and imported directly into Voiceover Studio. The tool simplifies the process of preparing scripts, whether for complex dialogues or simple narrations, ensuring content is structured correctly for seamless integration with ElevenLabs Voiceover Studio.
For more advanced scripting needs, an extended version of this tool is available that allows specification of start and end times for each line. Users requiring this additional functionality can access the advanced CSV generator.
Translating and Exporting
Once you’ve perfected your voiceover project, ElevenLabs Voiceover Studio offers powerful tools for translating your content and exporting your final product.
Translating into Different Languages
Voiceover Studio’s translation feature allows you to easily create multilingual versions of your project. Here’s how to use it:
- Locate the language selection menu, typically at the bottom of the interface.
- Click “Add Language” and select your target language from the list.
- The Studio will create a new version of your project in the selected language.
- Review the translated text in each clip, making any necessary adjustments.
- Generate the audio for your translated project.
The AI will not only translate your text but also use appropriate voices for the target language, maintaining the style and tone of your original version.
You can create multiple language versions of your project, making it easy to reach a global audience with your content.
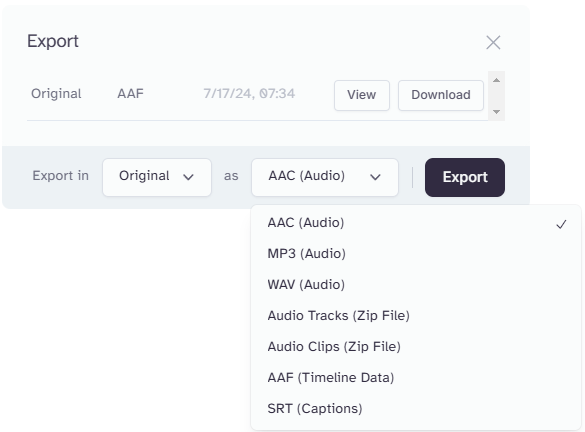
Export Options and Formats
When you’re ready to share or use your voiceover project, Voiceover Studio offers several export options:
- Audio-Only Export:
- Click the “Export” button, usually located in the top right of the interface.
- Choose your desired audio format (e.g., MP3, WAV, FLAC).
- Select the quality settings (bitrate, sample rate).
- Choose to export all tracks mixed together or as separate audio files.
- Video Export (if you started with a video):
- Select “Export with Video” to combine your voiceover and any SFX with the original video.
- Choose your video format and quality settings.
- Script Export:
- You can export your script as a text file or CSV, which can be useful for subtitling or further editing.
- You can export your script as a text file or CSV, which can be useful for subtitling or further editing.
- Project Export:
- This option saves your entire project, including all settings and tracks, allowing you to share it with collaborators or continue editing later.
- This option saves your entire project, including all settings and tracks, allowing you to share it with collaborators or continue editing later.
After selecting your export options, click “Export” and choose where to save your file. The Studio will process your project and provide you with the final output.
By mastering these advanced features and export options, you’ll be able to create professional-quality, multilingual voiceover projects and share them in whatever format best suits your needs.

Advanced Features
As you become more comfortable with ElevenLabs Voiceover Studio, you’ll want to explore its advanced features to create even more sophisticated and polished audio content.
Dynamic Generation vs. Fixed Generation
One of the key advanced features in Voiceover Studio is the choice between dynamic and fixed generation for your audio clips.
Dynamic Generation: This is the default mode in Voiceover Studio. When you use dynamic generation, the length of your audio clip automatically adjusts based on the content of your text. If you add or remove words from your script, the clip will expand or contract accordingly. This mode is particularly useful when you’re still finalizing your script or when timing isn’t critical.
Fixed Generation: In fixed generation mode, the length of your audio clip remains constant, regardless of changes to the text content. This mode is beneficial when you need precise timing, such as when syncing audio to video or maintaining specific pauses between lines. To use fixed generation:
- Right-click on a clip in your timeline.
- Select “Switch to Fixed Generation” from the context menu.
- The clip will now have a fixed duration, indicated by a lock icon.
You can switch between these modes at any time, giving you flexibility in how you approach your project.
Adjusting Clip Length and Position
Fine-tuning the timing of your audio is crucial for creating a polished final product. Voiceover Studio provides several ways to adjust clip length and position:
- Dragging: Click and drag the edges of a clip to adjust its length, or drag the entire clip to reposition it on the timeline.
- Precise Timing: Click on a clip to open its settings panel. Here, you can input exact start times and durations for pinpoint accuracy.
- Spacing Tool: This feature allows you to automatically adjust the spacing between clips. It’s particularly useful for maintaining consistent pacing in your project.
- Stretching and Compressing: For fixed generation clips, you can stretch or compress the audio to fit a specific duration without changing the pitch.
Remember, when you make significant adjustments to clip timing, it’s a good idea to regenerate the audio to ensure the best quality and natural-sounding results.

Case Study: Creating "The Unexpected Call"
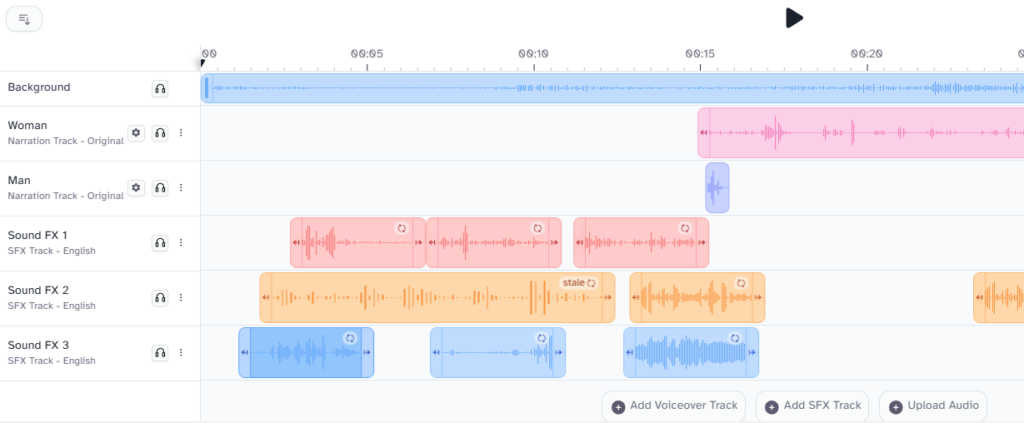
In this case study, we’ll walk through the process of creating a 1-minute minihörspiel (mini audio drama) titled “The Unexpected Call” using ElevenLabs Voiceover Studio. This project demonstrates the use of multiple voices, sound effects, and the timeline feature to create an engaging audio experience.
Project Overview
- Title: “The Unexpected Call”
- Duration: Approximately 1 minute
- Characters: Woman, Man (presumably a 911 operator)
- Sound Effects: Various ambient sounds and effects (labeled as Sound FX 1-5)
- Background Music: Created with SUNO AI
Step 1: Setting Up the Project
- Create a new project in Voiceover Studio.
- Add multiple Voiceover tracks for different characters.
- Add an SFX track for ambient sounds and effects.
Step 2: Scripting and Timeline Setup
Instead of importing a CSV, for this project we’ll add clips directly to the timeline. Here’s a breakdown of the script and sound effects:
					Sound FX 3: deep breathing in panic and crying
Sound FX 2: deep breathing in panic
Sound FX 3: sound of a rotary phone being dialed frantically
Sound FX 2: deep breathing in panic
Sound FX 1: phone beeping
Sound FX 3: deep breathing in pain
Sound FX 2: whimpering woman
Woman: "Hello? Please help me! I think someone has broken into my house!"
Man: "Hello?"
Sound FX 2: whimpering woman
Man: "Stay calm, ma'am. Where are you right now?"
Sound FX 3: Faint footsteps can be heard in the distance
Woman: "In the bedroom. I've locked myself in. Oh God, I hear footsteps on the stairs!"
Sound FX 3: footsteps on stairs creaking
Sound FX 2: woman breathing in panic
Sound FX 5: creaking floorboards
Sound FX 1: sound of drawers being opened and objects being moved around
Man: "Understood. Do you have anything you can use to defend yourself?"
Sound FX 2: deep breathing in panic
Woman: "Uh, yes, a pair of scissors. What should I do?"
Sound FX 3: whiff of panic
Sound FX 2: loud shot
Sound FX 1: body falling on floor
Sound FX 2: footsteps going downstairs and fading away
Using CSV for "The Unexpected Call"
					speaker,line
Sound FX 3,"deep breathing in panic and crying"
Sound FX 2,"deep breathing in panic"
Sound FX 3,"sound of a rotary phone being dialed frantically"
Sound FX 2,"deep breathing in panic"
Sound FX 1,"phone beeping"
Sound FX 3,"deep breathing in pain"
Sound FX 2,"whimpering woman"
Woman,"Hello? Please help me! I think someone has broken into my house!"
Man,"Hello?"
Sound FX 2,"whimpering woman"
Man,"Stay calm, ma'am. Where are you right now?"
Sound FX 3,"Faint footsteps can be heard in the distance"
Woman,"In the bedroom. I've locked myself in. Oh God, I hear footsteps on the stairs!"
Sound FX 3,"footsteps on stairs creaking"
Sound FX 2,"woman breathing in panic"
Sound FX 5,"creaking floorboards"
Sound FX 1,"sound of drawers being opened and objects being moved around"
Man,"Understood. Do you have anything you can use to defend yourself?"
Sound FX 2,"deep breathing in panic"
Woman,"Uh, yes, a pair of scissors. What should I do?"
Sound FX 3,"whiff of panic"
Sound FX 2,"loud shot"
Sound FX 1,"body falling on floor"
Sound FX 2,"footsteps going downstairs and fading away"
This CSV format allows for easy import and automatic creation of speaker tracks and clips in Voiceover Studio. It’s particularly useful for longer scripts or when collaborating with writers who prefer working in spreadsheet format.
Step 3: Voice Customization
For each character, select a voice that fits their role:
- Woman: A panicked, breathless voice with a hint of vulnerability
- Man: A calm, authoritative voice (like a 911 operator)
Adjust speaking rates and emotions to match the intensity of the scene. The woman’s voice should become increasingly panicked as the scene progresses, while the man’s voice should remain steady and reassuring.
Step 4: Creating Sound Effects
Use the SFX tracks to create the following sound effects:
- Deep breathing and crying (various intensities)
- Rotary phone dialing
- Phone beeping
- Whimpering
- Footsteps (distant, on stairs, fading away)
- Creaking floorboards
- Drawers opening and objects moving
- Gunshot
- Body falling
For each sound effect, use detailed prompts to get the most accurate and emotive sounds. For example:
- “Panicked, shallow breathing with occasional sob”
- “Old rotary phone being dialed frantically, with finger slipping on the dial”
- “Heavy footsteps slowly ascending creaky wooden stairs”
Step 5: Fine-tuning the Timeline
- Arrange the clips in the correct order according to the script.
- Adjust the timing of each clip to create a sense of urgency and building tension.
- Overlap dialogue with background sound effects (like breathing or footsteps) to increase realism.
- Ensure the pacing builds to the climactic ending with the gunshot and falling body.
- Use volume automation to make distant sounds (like the approaching footsteps) gradually increase in volume.
Step 6: Generating and Reviewing Audio
- Generate audio for all clips.
- Listen through the entire minihörspiel, paying attention to the flow and timing.
- Make adjustments to voice settings, sound effect volumes, and clip positioning as needed.
- Pay special attention to the realism of the sound effects and the emotional delivery of the dialogue.
- Regenerate audio for any modified clips.
Step 7: Final Mix and Export
- Balance the volumes of voices and sound effects, ensuring that dialogue is always clear but the sound effects create a palpable sense of tension.
- Add subtle room tone or ambience throughout the piece to avoid dead silence.
- Apply gentle compression to the final mix to even out volume levels.
- Add a fade-out to the final footsteps to end the piece.
- Export the final mix as a high-quality audio file (e.g., WAV or MP3 at 320kbps).
Step 8: The Result
The final product is a chilling, intense 1-minute audio drama that showcases the advanced capabilities of ElevenLabs Voiceover Studio. The combination of emotionally-charged voice acting, meticulously crafted sound effects, and precise audio editing creates a vivid, suspenseful scene that grips the listener from start to finish.
You can listen to the final audio production of “The Unexpected Call” below:
As you listen, notice how the voice modulation captures the increasing panic of the woman and the steady calm of the operator. Pay attention to the layering of sound effects, from the subtle background noises to the climactic gunshot. This audio demonstration highlights the professional-quality output achievable with ElevenLabs Voiceover Studio.
This case study demonstrates how Voiceover Studio can be used to create complex, professional-quality audio dramas efficiently. By leveraging features like nuanced voice customization, detailed sound effect generation, and precise timeline control, we were able to produce a compelling minihörspiel that rivals traditionally produced audio dramas.
The project particularly highlights the Studio’s strength in:
- Creating varied emotional states within a single voice (the woman’s increasing panic)
- Generating a wide range of specific sound effects
- Allowing for precise layering and timing of audio elements
For creators looking to produce audio dramas, podcasts, or immersive audio experiences, this case study shows that ElevenLabs Voiceover Studio provides all the necessary tools to bring complex audio stories to life, from script to final production.
Conclusion: The Future of Audio Production with ElevenLabs Voiceover Studio
As we’ve explored throughout this comprehensive guide, ElevenLabs Voiceover Studio represents a significant leap forward in the realm of audio production technology. By combining advanced AI-driven voice synthesis with an intuitive, feature-rich interface, it empowers creators to produce high-quality audio content with unprecedented ease and efficiency.
Let’s recap the key features and benefits we’ve discussed:
- Intuitive Timeline Interface: The studio’s timeline-based workflow allows for precise control over audio elements, mimicking professional audio editing software while remaining accessible to newcomers.
- AI-Powered Voice Generation: With a wide range of customizable voices and emotional tones, the studio offers unparalleled flexibility in creating distinct characters and narrations.
- Integrated Sound Effects: The ability to generate and seamlessly incorporate AI-created sound effects adds depth and realism to productions.
- Multi-Language Support: Easy translation and voice adaptation for different languages opens up global possibilities for content creators.
- CSV Script Import: This feature streamlines the production process, especially for longer or more complex projects.
- Advanced Customization: From adjusting individual voice characteristics to fine-tuning the timing of sound effects, the studio offers granular control over every aspect of the audio production.
As demonstrated in our case study, “The Unexpected Call,” these features come together to allow for the creation of professional-grade audio dramas, podcasts, and other content that can rival traditionally produced audio in quality and emotional impact.
Looking to the future, the potential applications of ElevenLabs Voiceover Studio are vast and exciting:
- Audiobook Production: Authors and publishers could dramatically speed up the audiobook creation process, potentially offering multiple voice options for the same book.
- Localization: Game developers and filmmakers could more easily create localized versions of their content for international markets.
- Educational Content: Teachers and e-learning platforms could produce engaging, multi-voice lessons and tutorials with minimal resources.
- Podcast Creation: Independent creators could produce full-cast audio shows without the need for multiple voice actors or expensive studio time.
- Accessibility: Written content could be more easily converted into audio format, improving accessibility for visually impaired individuals.
As AI technology continues to evolve, we can expect even more advanced features in future iterations of the studio. Potential developments might include:
- Even more realistic voice synthesis with nuanced emotional ranges
- Real-time voice changing for live performances or streaming
- Integration with virtual reality for immersive audio experiences
- Advanced audio cleanup and enhancement tools powered by AI
ElevenLabs Voiceover Studio is not just a tool; it’s a gateway to a new era of audio production. It democratizes the creation of high-quality audio content, allowing creators to bring their auditory visions to life with unprecedented ease and quality. Whether you’re a professional sound designer, a content creator, or an enthusiast looking to explore the world of audio production, ElevenLabs Voiceover Studio offers the tools and capabilities to turn your ideas into reality.
As we move forward, it’s clear that AI-driven tools like this will play an increasingly important role in shaping the landscape of audio content. By embracing these technologies and pushing their capabilities to the limit, creators have the opportunity to produce richer, more diverse, and more engaging audio experiences than ever before.
The future of audio is here, and it sounds incredible.